|
Cinderella
design by Gavin Atkin
The free plans for Cinderella may be downloaded for free by clicking the zip folder icon above. This folder contains building notes, a .hul file as well as the basic drawing in the following formats: .dxf, .dwg, .pdf, and .gif |
Cinderella
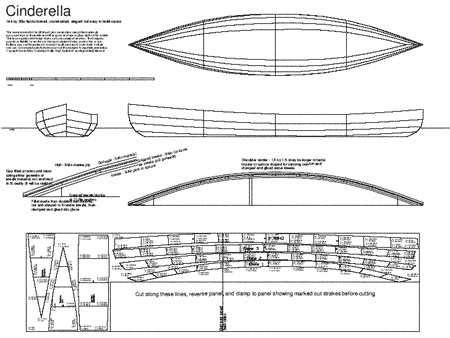
144 by 30in flat-bottomed, round-sided, elegant but easy to build canoe intended for stitch and glue construction using 3/8in marine ply epoxy and tape on the inside and either epoxy and tape or glass cloth on the outside.

It features a number of labour saving ideas intended to allow the builder with limited tools, money, skills and experience, to build a deceptively elegant little boat with the minimum of effort. The builder need mark out only one set of strakes: he or she then clamps the blank lower panel to the upper so that two sets of straked are cut out simultaneously (this method also ensure the strakes for both sides are identical).
Because of the large number of plotting points, there is no need to use flexible battens with lead weights, pins or whatever.
The bottom has no rocker fore and aft, so that by attaching the bottom to something rigid and straight and propping the sides of the boat while the glue sets the builder can be sure of achieving the intended shape.
Although this boat is to be built by the stitch and tape method - that is, stitched, then taped on the outside using duct tape, then epoxy taped on the inside, then epoxy taped or glass clothed on the outside - it is intended that most of the boat will not require stitching but will be held together during epoxying using the duct tape along.

(click image for PDF version of plans)
The inwale, gapping blocks and gunwale should all the of 3/4in material - probably some rot-resistant hardwood on the exterior, and whatever rot-resistant softwood is available on the inside.
Sequence for marking and cutting out
(i) Butt joint two panels using the Payson epoxy tape on both sides method
(ii) Plot all coordinates
(iii) Cut out bottom panels at ends and butt joint using the Payson epoxy tape method
(iv) Then cut out the blank lower panel REVERSE the panel so the scarfs in the final boat do not all coincide, then clamp the blank panel to the back of the marked-out panel so that all chines required can be cut out simultaneously.
The stitch and glue process is then as normal, except that the bottom should be attach to something flat - perhaps a floor or a couple of 6 by 2 timbers or whatever may be available. Temporary props should be used to ensure the sides do not cave in - a single 30in prop in the middle of the boat may be enough, but builders may find they need others further forward and further aft.
This is an experimental design drawn up by an untrained amateur. The Designer accepts no liability for any loss or damage sustained during construction or use. Builders may use these plans to construct small numbers of boats freely for their own use. Commercial manufacturers must ask the designer to negotiate permission. Copyright Gavin Atkin, Tunbridge Wells, Kent April 2005 email [email protected]
|

